
Tissue clearing is an extremely common technique to image structures deep within an organism while retaining the specimen’s overall spatial resolution. Since its development in the early 1900s, there have been a plethora of protocols that go about turning tissue clear. This article will focus on the different methods of clearing and what conditions are optimal for various applications.
Contents:
· What is tissue clearing?
· Why is tissue clearing used?
· How to clear tissues?
· Choosing the right clearing method
· Microscopy methods for cleared tissue imaging
· Conclusion
What is tissue clearing?
Tissue clearing is exactly what it sounds like -- the process of making tissue clear to image deep within three dimensional structures. Typically, immunofluorescence microscopy requires a thin section of tissue to maximize the resolution and fluorescence intensity of a sample. While this method is just fine for visualizing your specimen in two dimensions, imaging the full volume of your specimen may be required to gain insight to the structure and function of your marker of interest.
Why use tissue clearing?
One major caveat of leveraging microscopy techniques to visualize fluorescent proteins in an organism, is the inability to image deep within tissues. Even the most advanced multiphoton microscopes can only image a couple of millimeters below the specimen’s surface. Noninvasive imaging techniques such as magnetic resonance imaging and positron emission tomography can image much deeper but sacrifices resolution, limiting the ability to distinguish smaller structures like individual cells. Tissue clearing mitigates these issues by facilitating deep imaging at a high resolution. Rather than the physical sectioning of tissue that is required for traditional immunohistochemical techniques, cleared tissue utilizes optical sectioning to generate a three-dimensional reconstruction of your specimen. Together this data preserves the spatial information of the tissue, allowing for full profiling of your structure of interest. The ability to analyze the entire volume of you tissue allows for greater collection of data while drastically reducing the labor of sectioning and imaging.
How to clear tissues?
As you probably know, light must pass through your specimen for it to be visualized through a microscope. For thick, intact tissue, there is a limitation for how deep light can penetrate, causing a drastic drop-off of fluorescence intensity. This is because the biological tissues of your specimen all have differing properties that light scattering and absorption. The goal of tissue clearing is to minimize the ability to absorb and scatter light by decolorizing and matching the refractive index of your sample with the solution it is in.
The following are the general steps for carrying out tissue clearing:
1) Fixation: Preservation of the cellular and molecular architecture of your tissue.
2) Permeabilization: To allow the diffusion of fluorescent antibodies and reflective index matching solution throughout your sample.
3) Decolorizing: Reducing any pigmented regions that cause absorption and decay of transmissible light through your tissue.
4) RI Matching: Utilizing solutions that match the refractive index of your tissue to reduce light scattering allowing for increased light penetration.
Choosing the right clearing method
In the last decade, there has been a surge in the development of novel tissue clearing techniques. With each protocol there are limitations that depend on the type of tissue, method of microscopy, and analysis of the data collected. Next, we will be going over several different types of clearing methods and discuss which will best suit your three-dimensional imaging needs.
Organic solvent tissue clearing
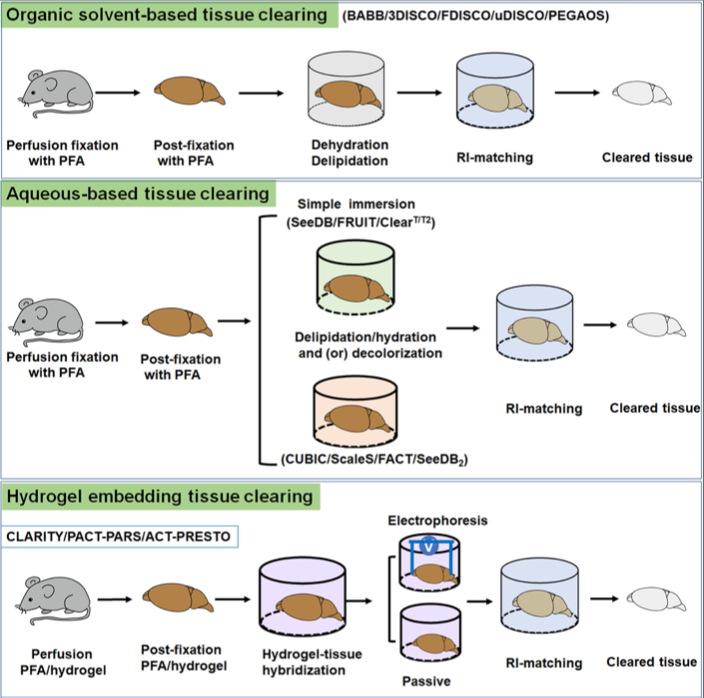
How it works: Generally, this technique requires the dehydration followed by delipidation and refractive index matching of your sample. Dehydration is achieved by incubating the tissue in increasing concentrations of alcohol. The latter two steps are carried out by immersing your samples in an organic solvent (i.e. benyl benzoate: benzyl alcohol, BABB) solution that delipids and surrounds all protein-based structures, making them transparent.
Pros: A major advantage of this technique is the is the high efficiency and fast speed of tissue clarity, even with very large samples. Whole mouse brains take only a few days to completely clear while small structures such as organoids can clear in seconds.
Cons: This method is not compatible with endogenous fluorescence imaging. Proteins such as GFP become denatured in the dehydration process and all fluorescence will be lost. Scientists have found ways around this by staining with anti-GFP antibodies to visualize these components. Lipid staining is also impossible with this process as refractive index matching strips your sample of all lipids. Another disadvantage of this method is that the BABB mixture is dangerous to both your person as well as your microscopy equipment. It needs to be handled with extreme care and your sample must be sealed or imaged with a BABB objective to avoid damage to your microscope. Finally, this technique also causes shrinkage of your tissue due to the dehydration step and could cause deformation of key structures.
Available protocols: uDISCO, FluoClearBABB, iDISCO+, 3DISCO
Aqueous tissue clearing
How it works: There are two different types of aqueous based clearing methods: simple immersion and hyperhydration
1) Simple immersion is where an aqueous solution with a high refractive index is added to your sample. The goal, as with all clearing methods, is to best match the refractive index of your tissue which gradually turns it transparent over time.
2) Hyperhydration involves removing the lipids of your sample with detergents and urea. This process denatures the hydrophobic regions of the cell membrane facilitating the hydration and refractive index matching of your sample.
Pros: A major benefit of these methods is the reagents are much less hazardous to work with when compared to organic solvents. Simple immersion offers the advantage of lipid staining and fluorescent protein compatibility. This simple method also does not alter the size of the tissue and is best suited for assays that require the structural integrity of your sample be retained. Hyperhydration is often a preferred technique because of its high efficiency of clearing and ability to clarify large structures.
Cons: Simple immersion has limitations in how large a sample must be to fully clear. This technique can only be carried out on small tissues about 1-2 millimeters in thickness. This is because simple immersion does not remove the lipids of the sample which is the main source of light scattering. Hyperhydration has the disadvantage of causing expansion of your tissue and structural deformation. Most of these methods do not offer compatibility to preserve fluorescent proteins or membrane stains. Other disadvantages include a slow clearing rate, taking up to several weeks to reach clarity of large structures
Available protocols: FRUIT, RTF, FACT, CUBIC, ScaleS.
Hydrogel embedding tissue clearing:
How it works: The general principle of hydrogel tissue clearing is to cross link the proteins in your sample, generating a tissue-gel hybrid. The sample is first embedded in a synthetic gel or polyepoxide. Subsequent steps include delipidation using detergent and finally refractive index matching in immersion solution. More advanced protocols also include an electrophoresis step to increase the rate of clearing and improve the penetration of antibodies into larger tissue structures.
Pros: Hydrogel embedding techniques are known for their extremely efficiently clearing capabilities. Though these protocols are not known for their lipid preservation abilities, they are mostly renown for assays that require endogenous fluorescent protein visualization. Some techniques can even retain transcripts so that RNA based assays such as in-situ hybridization can be performed on cleared tissue.
Cons: The main caveat of this technique has to do with their laborious and time-consuming protocols. Tissue clearing can take days to weeks to achieve transparency depending on the size of the tissue. To work around these issues, electrophoresis and profusion equipment are required. However, this equipment along with the refractive index matching solution for latter steps can be quite expensive.
Available protocols: CLARITY, PACT, PARS
What microscopy method is best for cleared tissue?
With the growing advancements in microscopy techniques in recent years, scientists have made strides in developing methods for effectively imaging at high resolution within thick tissues. As we previously discussed, the main limitation for how deep we can image the degree of light scattering that perturbs the penetration of light needed for visualization. Tissue clearing has resolved this issue, allowing for increased accessibility for imaging within your specimen even with rudimentary microscopy techniques. Now that depth of imaging is no longer a restriction, you can use the other properties of your microscope to refine your method of choice increasing the rate of imaging and amount of data you can collect. This is crucial for assays including large-scale drug and genetic screens in order to optimize the scalability of your experiment. Next, we will discuss considerations when choosing what microscope is best for imaging cleared tissues.
1) Confocal Microscopy: Confocal microscopy is a gold standard method for obtaining high resolution images in three dimensions. The versatility in the number and types of fluorescence channels that can be imaged simultaneously can be a major advantage for collecting multiple outputs in one scan. The main disadvantage of this microscopy technique is that the rate of imaging is limited by the scan speed of the microscope. This technique also requires careful optimization when setting laser intensity and the number of images acquired from a single specimen to avoid photobleaching your sample.
2) Two-photon microscopy: Multiphoton microscopy is a much more sophisticated deep imaging technique, having the ability to image 1-2mm within uncleared tissue. This capability in combination with clearing techniques provides further advantages as it is much less likely to photobleach your sample using this method. This technique is also better optimized for generating full volumetric reconstruction of your sample compared to confocal microscopy. Multiphoton functions similarly to confocal microscopy and has the same limitations as far as acquisition rate goes. Another downside with this technique is that it requires a much more elaborate setup and can get quite expensive when compared to other microscopy methods.
3) Light-sheet microscopy: Light sheet microscopy functions by illuminating an entire plane of your sample rather than a single point like in single/multiphoton microscopy. This property gives this method the advantage of generating full volumetric imaging of your cleared sample at a very high speed. This method even further reduced the chance of photobleaching and generates a high signal to noise ratio as no region outside of the focal plane that is being imaged can be excited. This is best suited for highly scalable imaging techniques as one can fully image many samples in a short period of time.
Conclusion
Tissue clearing has been a major solution for imaging structures, deep within intact tissue. From neuroscience to oncology, scientists have had robust benefit from these techniques by gaining insight to the anatomical nature and spatial significance of candidate proteins of interest. Having the ability to collect information from the full volume of your specimen also reduces the bias that was previously carried with analyzing single sections of tissue. There are also benefits in drastically increasing the throughput of data collected while at the same time reducing sectioning and staining labor when compared to more traditional immunohistochemical techniques.
Major advancements in these protocols will no doubt continue to progress by allowing for the visualization of structures that may be lost during the processing of samples with current techniques. Until then, it is important that you consider what protocol is best suited for your type of assay and output of interest. Microscopy parameters are equally important when it comes to resolution, acquisition rate and amount of the data collected. Depending on your imaging parameters, it is possible that massive files of data can be collected and require sufficient storage and bandwidth to analyze. For long term imaging storage and large data sets, consider Biodock as a convenient way to store and access your immunofluorescence imaging directly from your browser!